

![]()
 Permit
- A permit is required for all overnight stays in Yosemite National
Park. Permits can be reserved online ahead of time (use the website
here
for more info on trailheads/permits/current conditions). Cost is $5
per person and another $5 for processing (only charged if your permit
is successfully processed). Permit is picked up in person at ranger
station. Also, $35 to enter Yosemite National Park per vehicle.
Permit
- A permit is required for all overnight stays in Yosemite National
Park. Permits can be reserved online ahead of time (use the website
here
for more info on trailheads/permits/current conditions). Cost is $5
per person and another $5 for processing (only charged if your permit
is successfully processed). Permit is picked up in person at ranger
station. Also, $35 to enter Yosemite National Park per vehicle.
Mileage - We did about 7 miles from Hetch Hetchy Overnight Camping lot to Rancheria Falls Camp and another 7 on the way back. Your mileage may vary depending on site selection. See map/profile below.
Camps/Water/Trailhead - There is a bathroom and trash at the Hetch Hetchy Overnight Camping lot, and another bathroom/trash and water on the northeast section of the one way loop road on the way in.
Hazards - Black Bears (bear canisters required!), creek crossings, Poison Oak, flies (they were annoying) and Mosquitoes. Ranger # 202-372-0200 (always check with ranger ahead of time for current water/trail conditions). Road is only open during daylight hours.
- Day 1 - Day 2 - (click the day you want or just scroll through them all :-)
Day 1 (Hetch Hetchy Overnight Parking lot to Rancheria Falls Camp, ~ 7 miles)
Tyler and I (along
with 13 other scouts) went on this 14 mile adventure from the Hetch
Hetchy Overnight Parking lot to the camping area called Rancheria Camp.
There is no fancy campsite there, besides some well worn flat areas
for tents and some fire rings. Permits can be challenging to get in
Yosemite, so either plan ahead or take your chances on a same day permit.
We luckily have someone for the troop that arranges all of our permits/reservations.
She rocks.
Some important things to note about this trailhead: The road in is only opened during daylight hours. The entrance station is located along the road on the way in. We took Evergreen Road on the way in instead of Cherry Lake Road. The rangers recommended using that road instead unless you are a local - it looks a lot more curvy than Evergreen. The road in is narrow in spots but overall in good condition.
You have to pay
the Yosemite seven day pass fee of $35 per vehicle (unless you have
a yearly pass) at the entrance station. You also have to pickup your
permit at the entrance station in person as well. They will ask you
about bear canisters as they are required. If you need canisters you
can rent them from the rangers here. Yosemite has also gone to the pack
out your used toilet paper, so be prepared for that on the trail. As
I said, we took Highway 120 past Buck Meadows to Evergreen Road (good
signage for Hetch Hetchy). Stay on the main road (Evergreen) as you
wind your way down past a lodge to a "T" where you turn right
(good signs again). You quickly arrive at the entrance station and then
head the rest of the way (7 miles if memory serves) down to reservoir.
The road in is a one way loop with you going past the bathrooms with
water first (northeast part of loop) and then going back up past trailhead
and day use parking to the overnight parking at the backpackers trail
camp. Park in the overnight parking section (two smaller lots on either
side of the roadway) and then walk down the road to the dam/trailhead.
Here is the lot closest to the bathrooms where we parked. The rangers
give you a parking pass to hang from the rearview mirror and also to
return to them when you exit.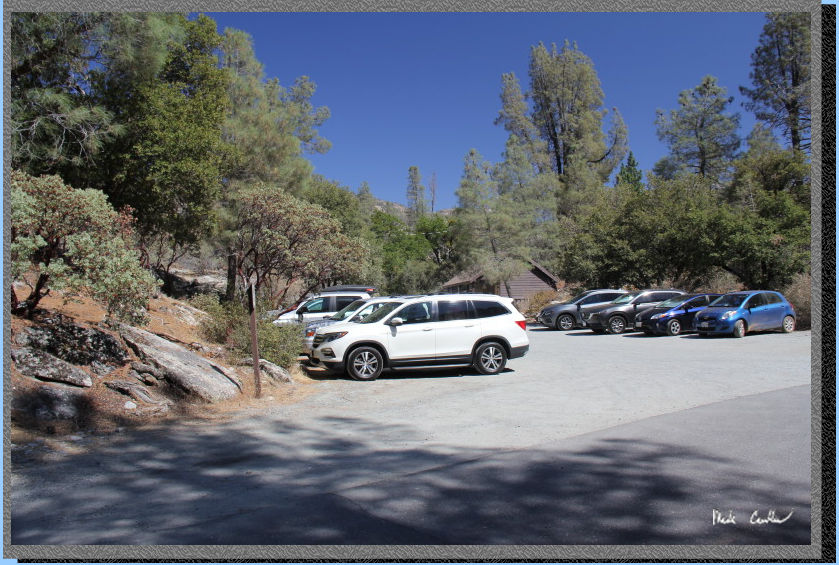
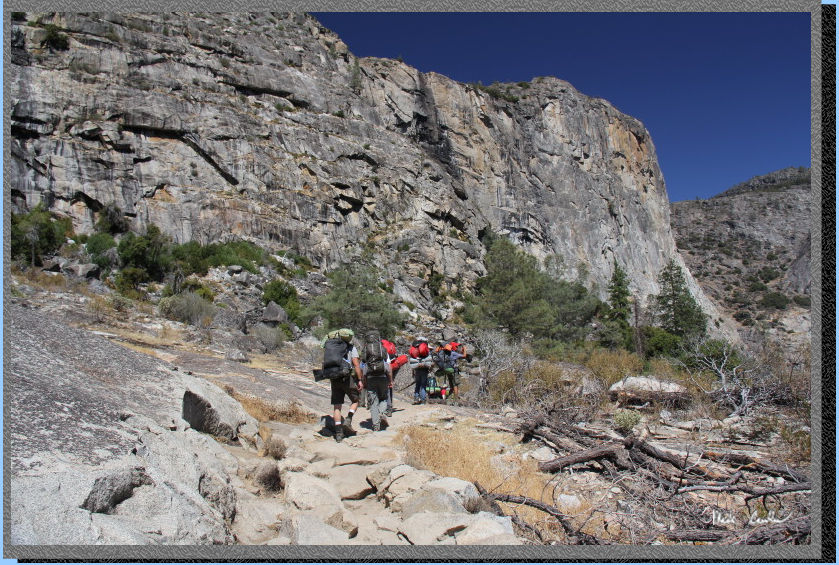
I have to mention
that it was hot, like really hot, this afternoon. Yes, we started hiking
after noon and it got up to the 90's. We all planned on bringing a lot
of water to stave off any dehydration. The trail starts out just under
4,000 feet and camp sits at 4,500 feet. The GPS reported just over 2,000
feet uphill and 1,500 feet downhill. See profile at bottom
of page or on the BIG map page
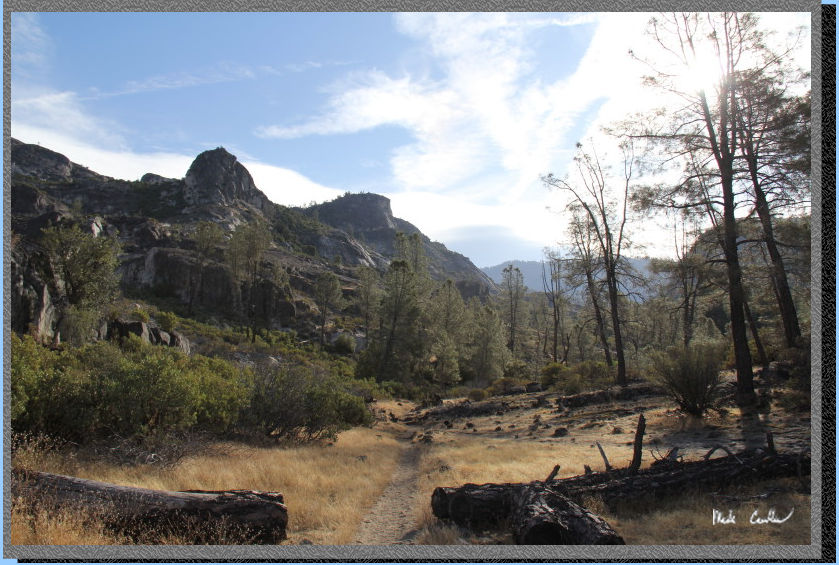
if interested. Because of the low elevation there is plenty of Poison
Oak along the trail. It was a nice red warning color for us. We headed
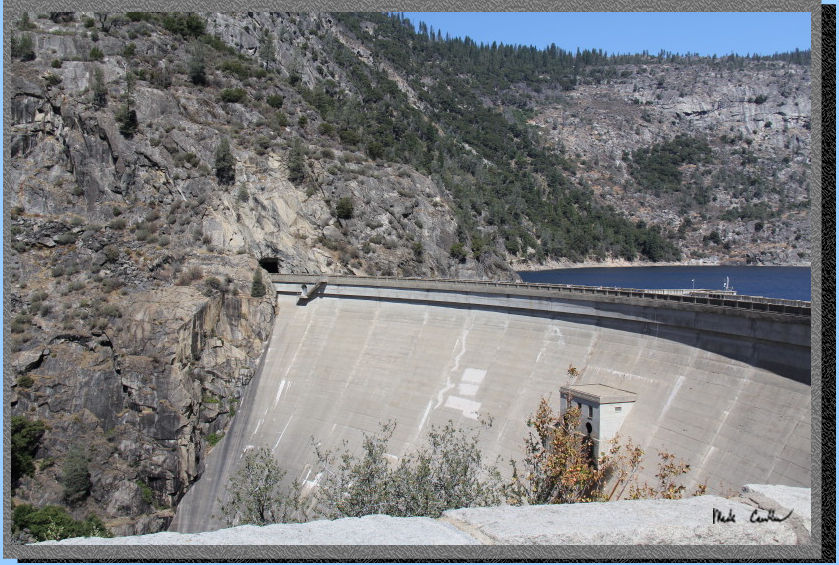
down the road toward the O' Shaughnessy Dam. The trail goes over the
top of the dam and through the tunnel on the other side. It is a pretty
cool way to start a trip! Here is a shot on the way down to the dam
along the road. When you go across the top you can look down the face
of the dam to the river below. The visible face is over 340 feet, but
it actually extends 430 feet to the bedrock below (so I have heard).
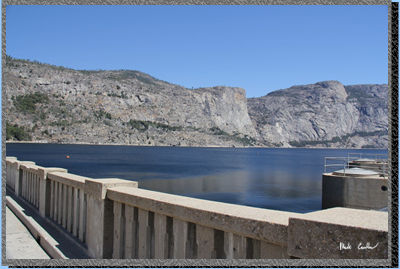
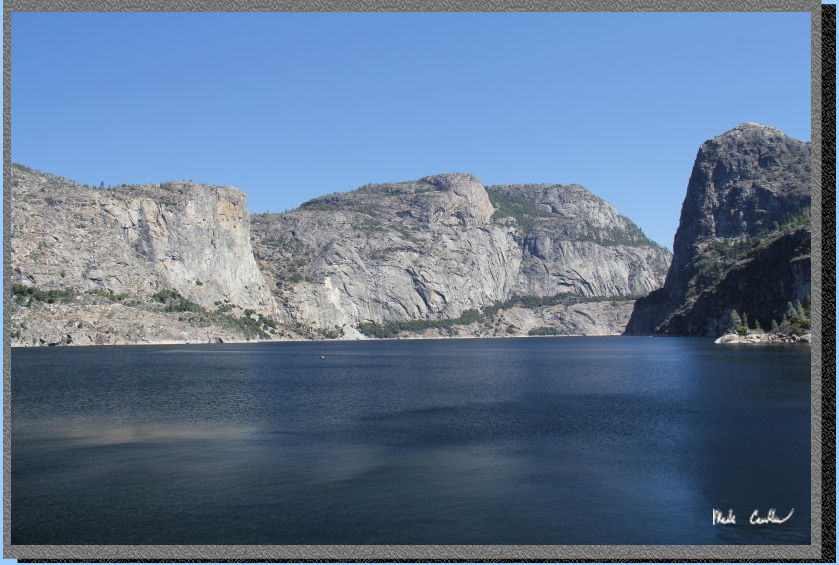
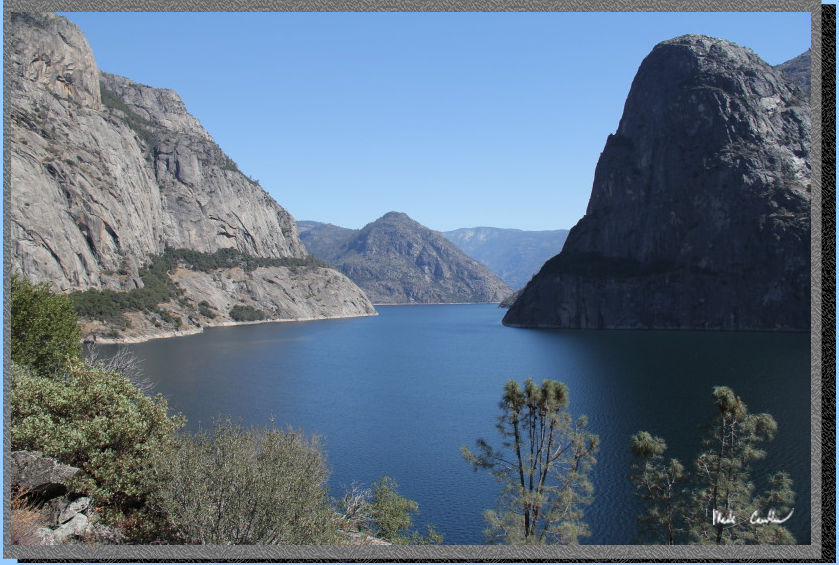
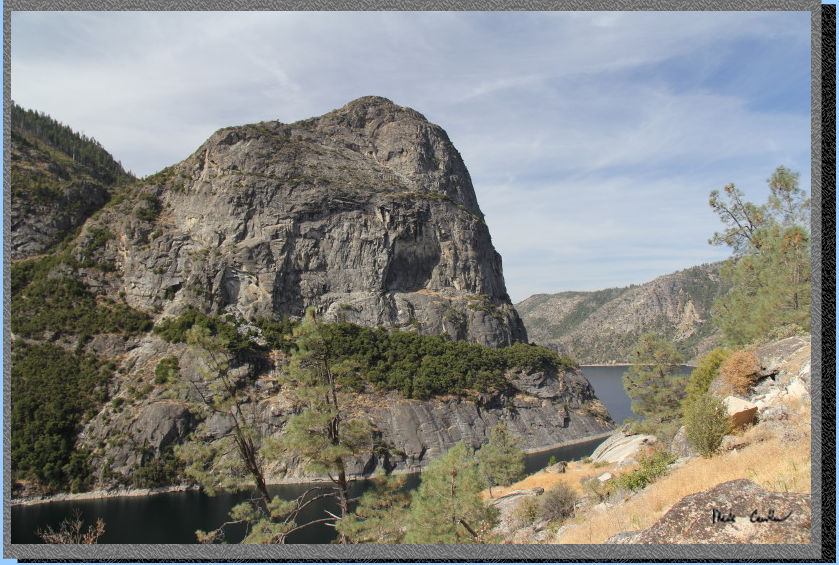
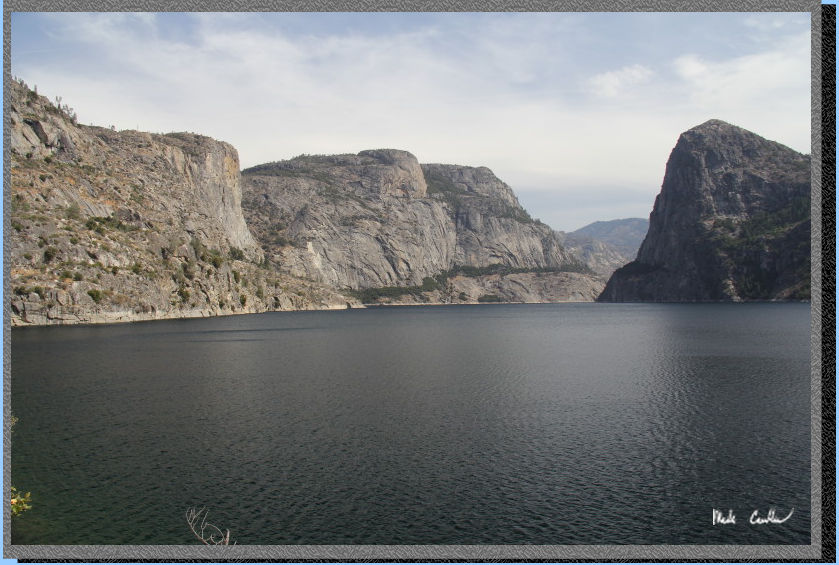
Looking out at the
reservoir and the magnificent granite formations around it I can see
why there are people that want to see this reservoir drained. It holds
117 Billion gallons of water (yes, with a "B"). The reservoir
is eight miles long and the largest body of water in Yosemite. In this
shot you can see Kolana Rock on the right and Hetch Hetchy Dome in the
middle. No boating or swimming is allowed in the reservoir.
So I took much better notes on the way back out then the way in. We
were trying to keep scouts motivated (and moving) on the way in (which
is more uphill). If you want to have a better idea of trail conditions
you can zoom down to Day 2). The trail starts off
pretty level before climbing slightly to have better views of the reservoir
like below. The trail is exclusively on the north side of the reservoir
so route finding is very easy. The trail is mainly open (not much tree
cover) so plan for some sun protection. The trail crosses several creeks/waterfalls
and can be impassable in early spring runoff conditions.
Looking back at
the dam in the distance now.
While most of the grades are easy there are some sections with switchbacks
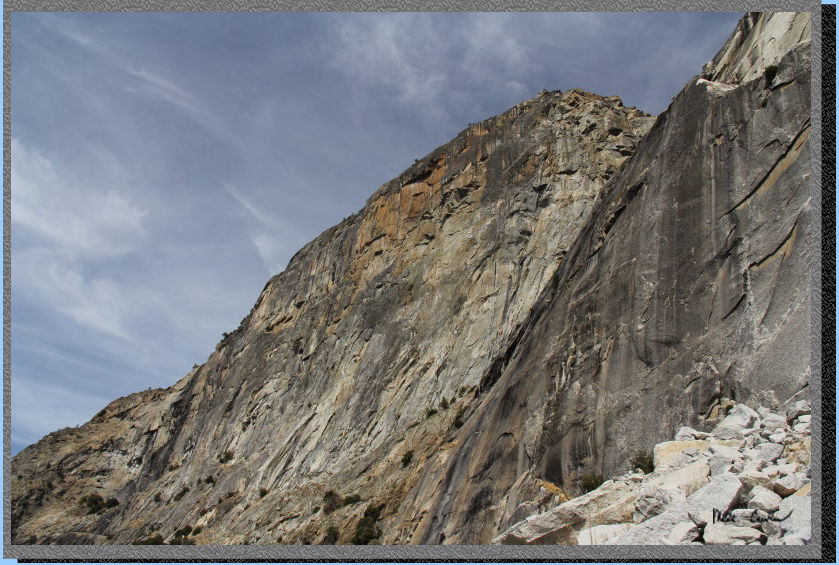
as you ascend. Here is what I thought of as a mini El Capitan.
It was strange hiking
along this trail and looking out at the reservoir in the beginning as
it made it look like the reservoir ends just past Kolana Rock (on the
right in picture). Once you hike a bit east you can see the reservoir
continues. It also continues in the distance even more, but terrain
limits the visibility.
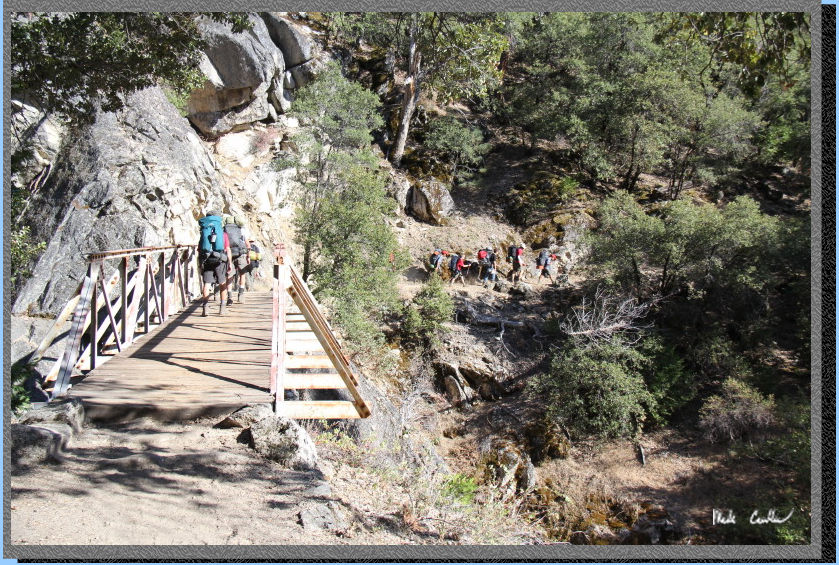
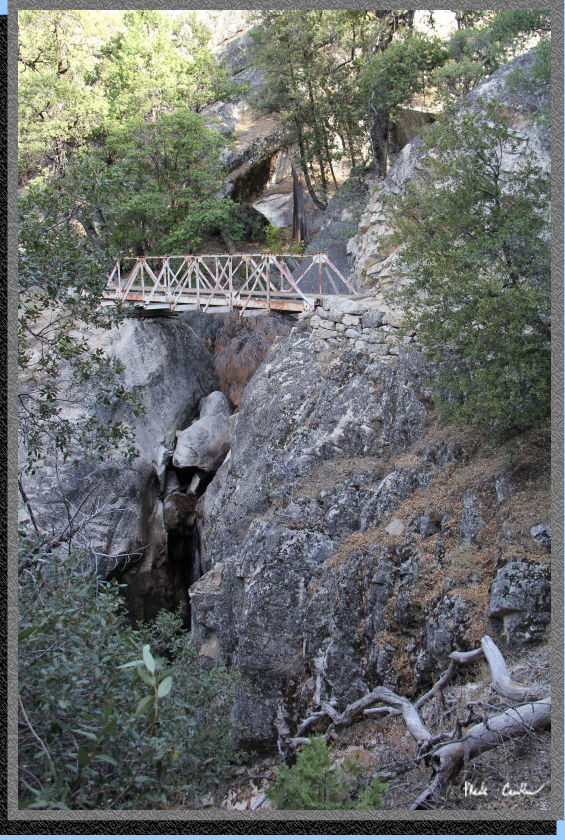
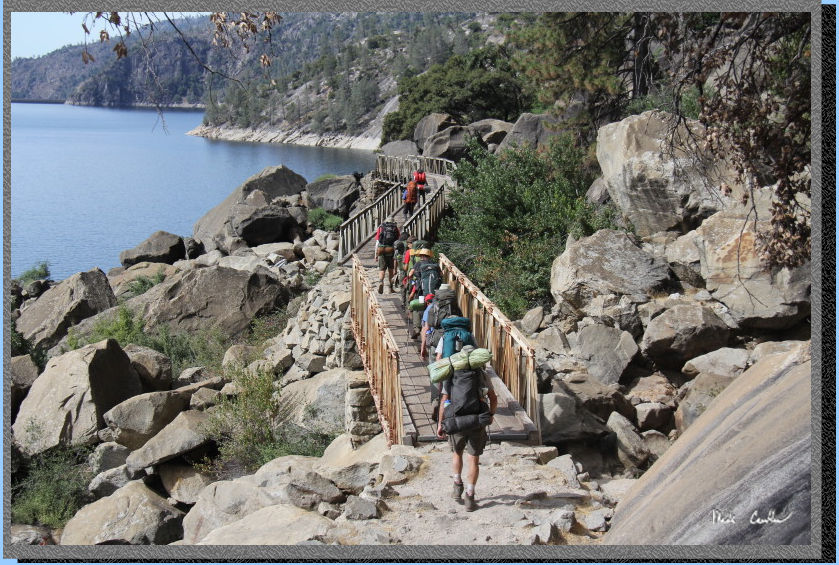
There are several
footbridges that take you over the creeks/waterfalls. I left the better
pictures and description on the way out (so be sure to read Day
2, or at least scroll through the pictures).
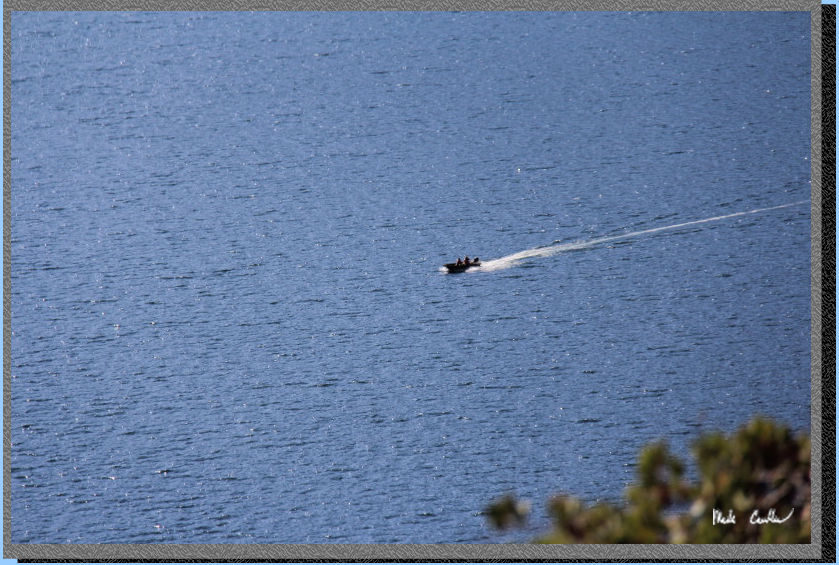
Here are what I
think are the rangers patrolling the reservoir. It must be nice to be
the only ones allowed out on the water. You can see in this shot that
the wind had picked up that afternoon.
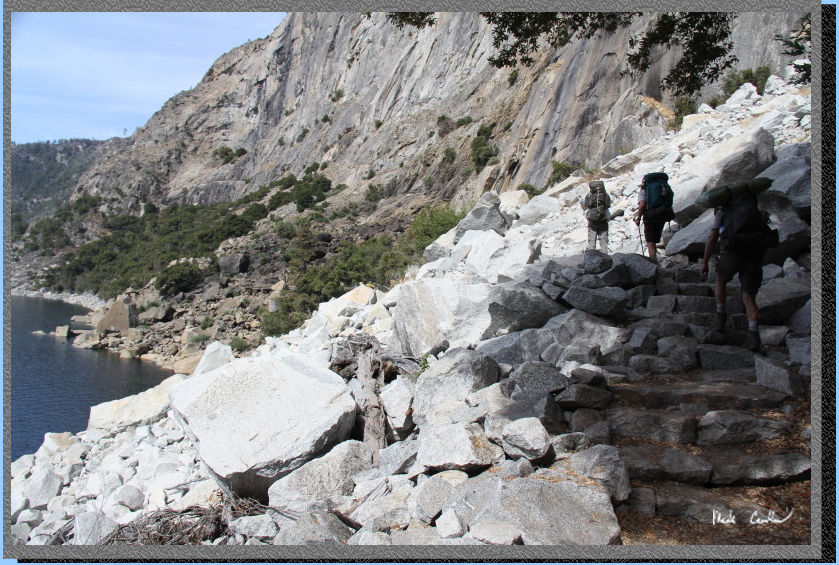
This section of
trail is one that made me appreciate the sure-footed trail. Falling
here could make a splash. Maybe you would get a boat ride, if you survive.

The trail continues
following the shoreline of the reservoir before ascending (and then
descending) to Tiltill Creek.

Here we are crossing
Tiltill Creek on another footbridge. Not much water flow in this creek.
The trail goes inland now to Rancheria Camp. Trail is uphill and dusty.
The foliage turns to mainly Manzanita as you approach camp. There is
no sign for camp but if you come across another trail junction you went
to far. The map shows a spur trail that just ends short of Rancheria
Creek. That spur trail is actually where the campsites are located.
Day 2 (Rancheria Falls Camp to Hetch Hetchy Overnight Parking lot, ~ 7 miles)
After reaching camp
we focused on filtering water, setting up tents and cooking dinner.
There were enough of us to split up the tasks. We filtered water out
of Rancheria Creek (very nice clear/cool water). It got dark soon after
tasks were done, so we packed up canisters and went to bed. The rangers
require you to camp on established sites through here to lessen impact.
That means no new fire rings and no new tent sites. There are plenty
of flat spaces for tents in this area, and several fire rings. Fire
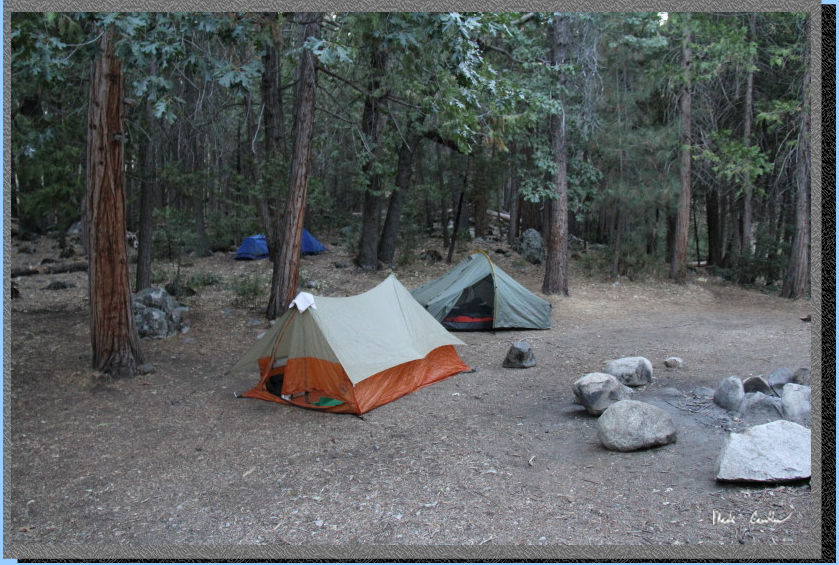
danger was high, so no fires were allowed when we were there. Here are
some of the adult tents early on day two. We tried to hike out early
enough to beat some of the heat (and to make it out for a late lunch
in Groveland). Scouts are motivated by patches, and promises of food.
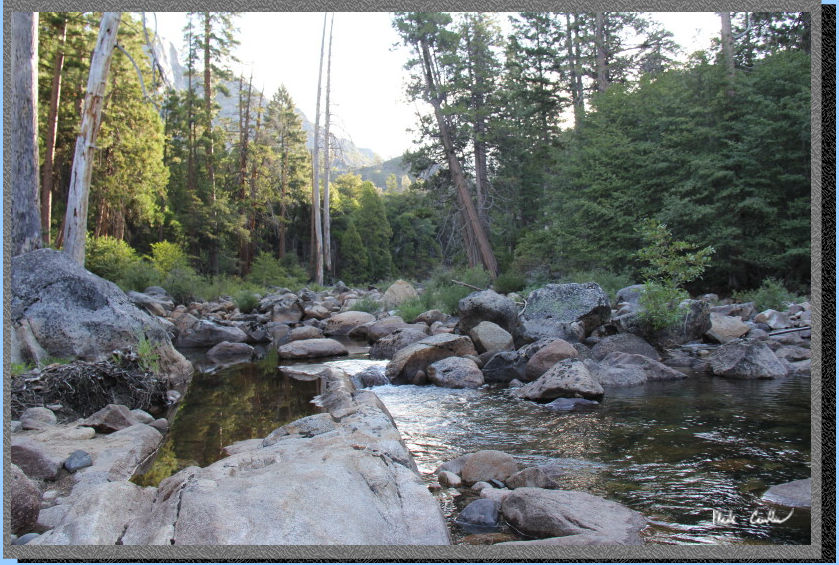
Here is Rancheria
Creek that morning. There was enough water to soak feet the night before.
Water was moving well and free of anything that clogs filters. So nice
to have an easy time getting pure water. We used a combination of water
pumps/water treatments tablets and a gravity filter into a 5 gallon
collapsible container. All options seemed to work well and we ended
up with more water than we needed the next morning.
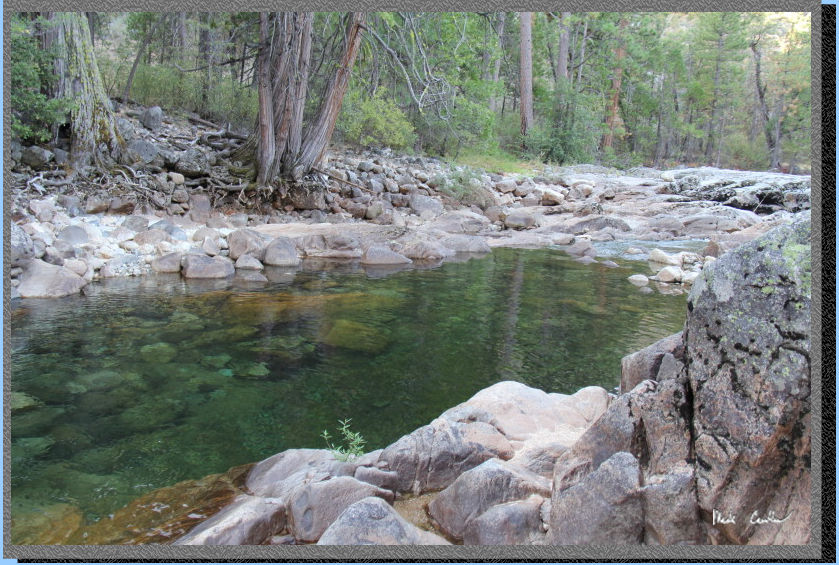
I need to mention that there is an awesome pool of water that I would
have liked to get into the day before. Given the late hour of our arrival,
a swim was out of the question. I am sure this was not the only spot
that would have been fun to explore along this creek. Here is the shot
of the pool. The water is nearly perfect here, so it looks shallow but
really 6 to 8 feet deep.
We packed up and then made sure to sweep camp of anything left behind.
We found very little trash along the trail on this trip. At camp I picked
up a few minor things left behind by previous campers, but overall I
was impressed how clean it was. We hit the trail and started downhill
with the trail running parallel to the creek at first. If you are quiet
you could hear some of the cascading sections of the creek. Here is
the view to the south as you hike along this section.
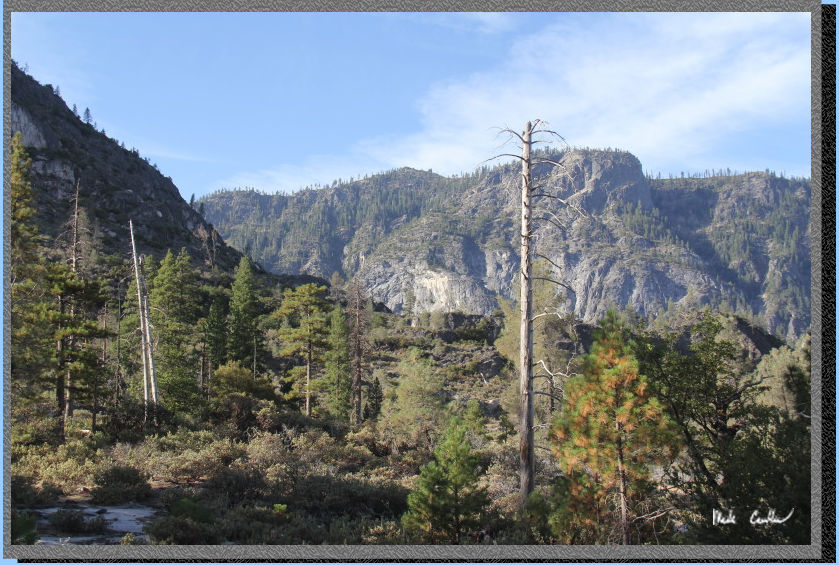
The trail continues
downhill to the Manzanita section of trail. It obscures the reservoir
views a bit but not the views of the surrounding high granite formations.
Here is section looking back towards camp.
Continue downhill
to a shaded Oak section. You will hear Tiltill Creek in the distance
before you see it.

Traverse the switchbacks
to a shaded and level section of trail that crosses Tiltill Creek. Here
is the bridge across Tiltill Creek. There was not much flow, but look
at how cool the bridge is.
Continue over the bridge to more partially shaded trail with the cover
of Oak Trees. The trail gets more exposed as it goes around the next
corner. The trail will start to climb now through an exposed rocky section.
Cool texture shot.
The trail levels
off again with unobstructed views of the reservoir. There was a slight
breeze, but noting like the awesome breeze we had the previous afternoon.
Without that breeze the previous day we would have all suffered a little
more in the heat. Trail goes uphill around the next corner on a granite-sand
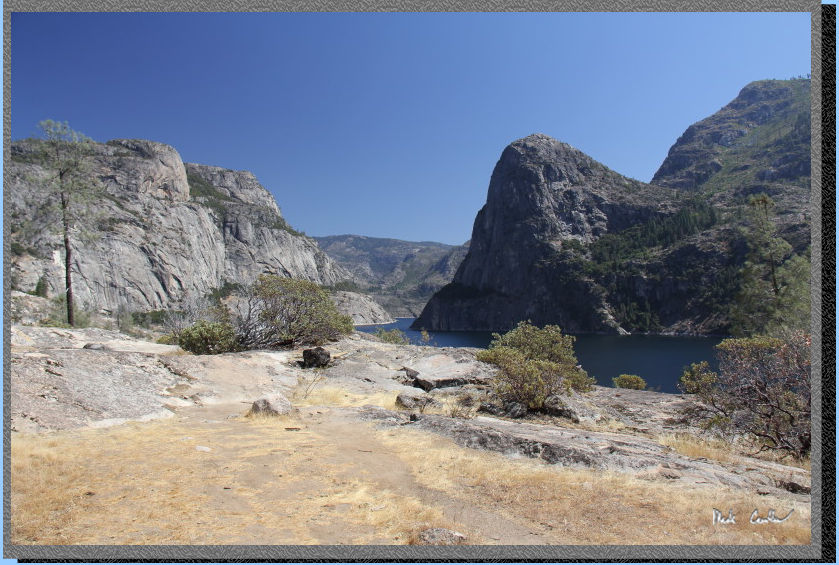
trail. Slight haze today. Trail remains mainly exposed. Here is Kolana
Rock.
Continue the gentle
ups and downs through the mainly exposed trail (except for short respites
of shade). See the picture below of how short.
The granite monoliths
are amazing through here. It is hard to capture the scale of these enormous
rocks until you are hiking below them. There is one decent uphill section
with some switchbacks next. Eventually you head back downhill with the
treat of some shade again, provided by some Oaks and Bayleaf Trees.
Trail levels off for a bit before heading downhill. Then there is a
very brief uphill before the bridges to Wapama Falls.
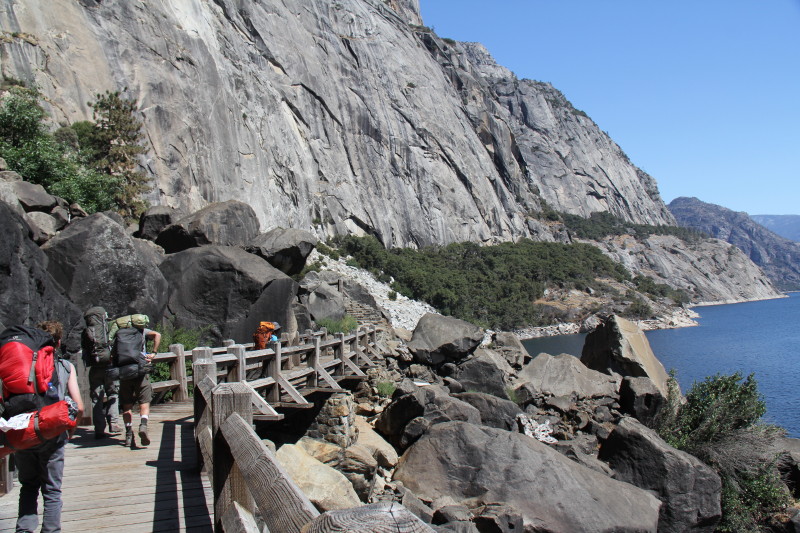
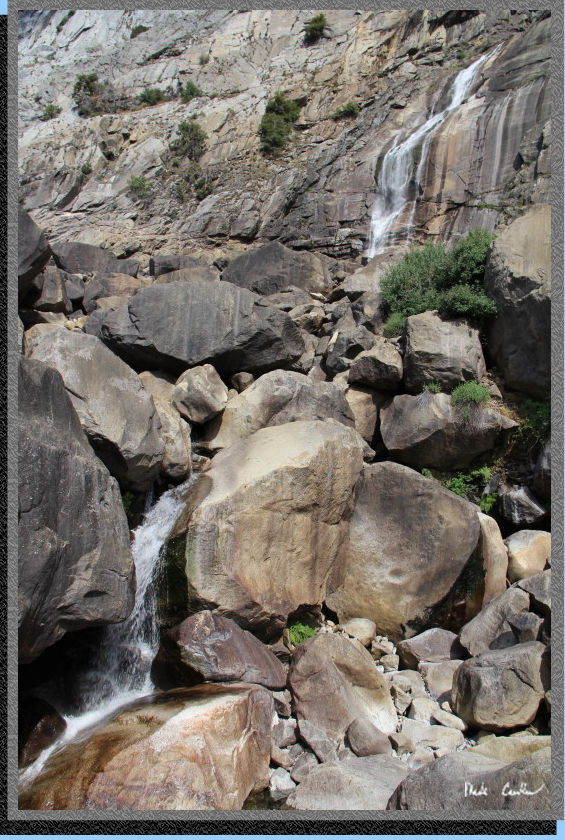
Here are the bridges
over Wapama Falls. We slopped here a bit to have a snack and take some
pictures in front of the falls.
Part of Wapama Falls.
There are gates on the footbridges through here to allow the rangers
to close the trail. I have been told that at peak flow the water goes
over the footbridges.
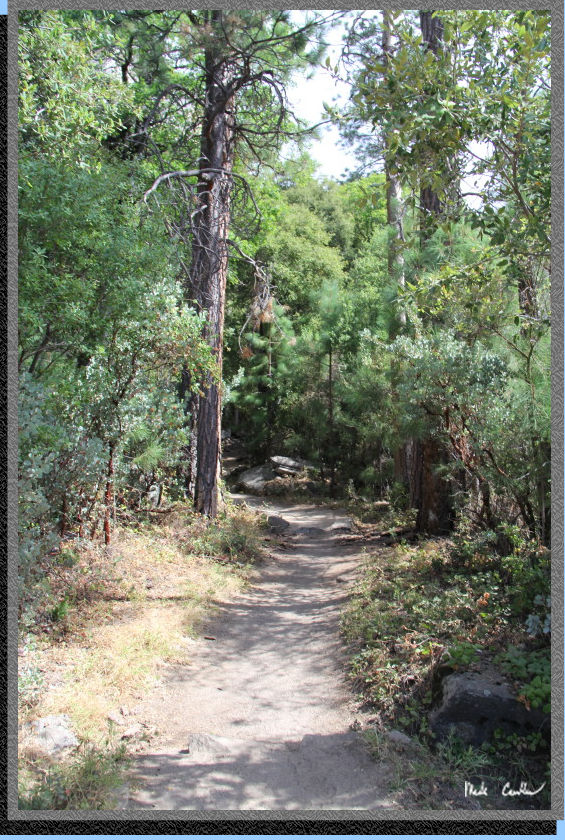
Continue past the
falls/footbridges to a rocky step uphill section. The trail then levels
off and goes through a Pine Tree grove (see picture below) that provides
some shade. The next section of trail is mainly level and out on exposed
slabs of granite.
Here is the level
exposed section that has killer views. I took this shot looking back,
toward the east.
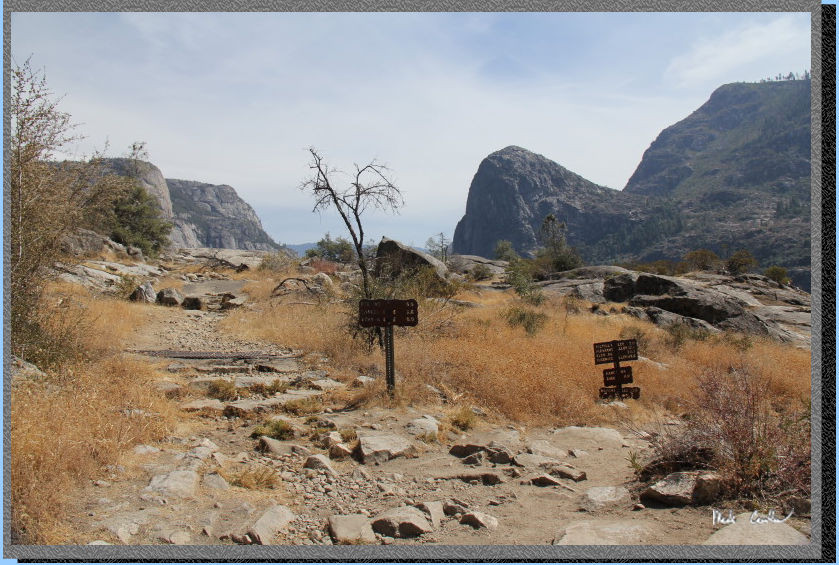
The trail has another
stepped ascent next. It eventually levels off at the junction with Beehive
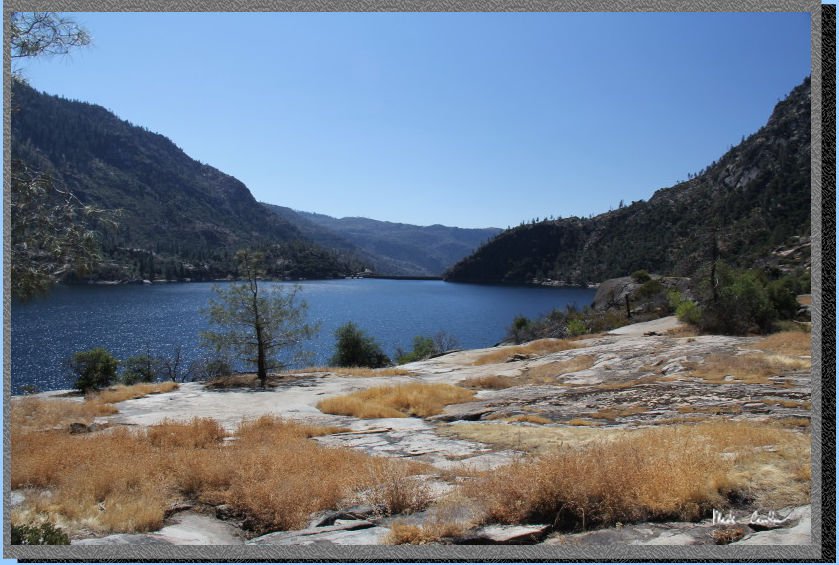
Meadow and Laurel Lake. The rest of the trail to the dam is downhill/level
with a mixture of sun/shade. If you look to the west you can make out
the trail ahead, lower in elevation along the shore of the reservoir.
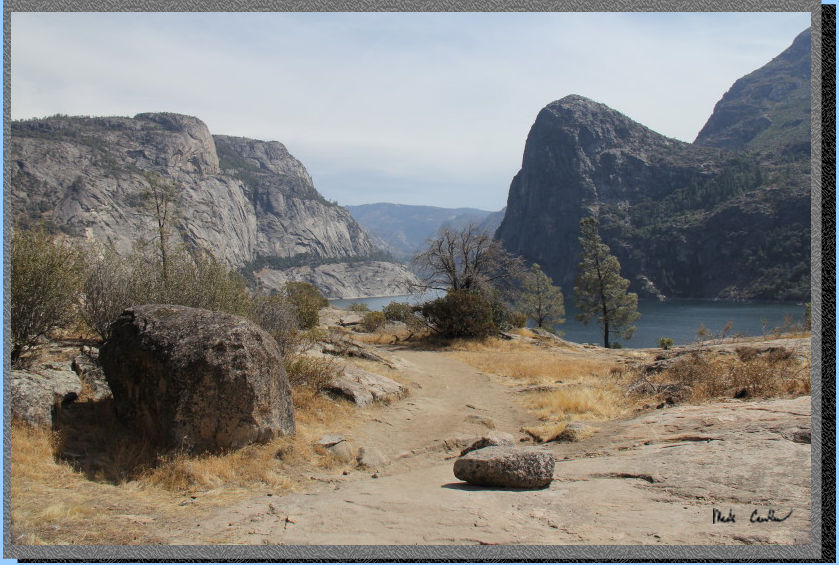
The junction is seen in the picture below (looking to the east after
we passed through the junction on the way out).
This section of
trail is really hard to beat for views. I was also surprised how few
backpackers we saw on the trail. It sounds like there is a nice loop
option should you want to explore further to the north (more elevation
gain than what we tackled). I recommend that you check out Hetch Hetchy.
You will not be disappointed. I mean look at the view! Map and profile
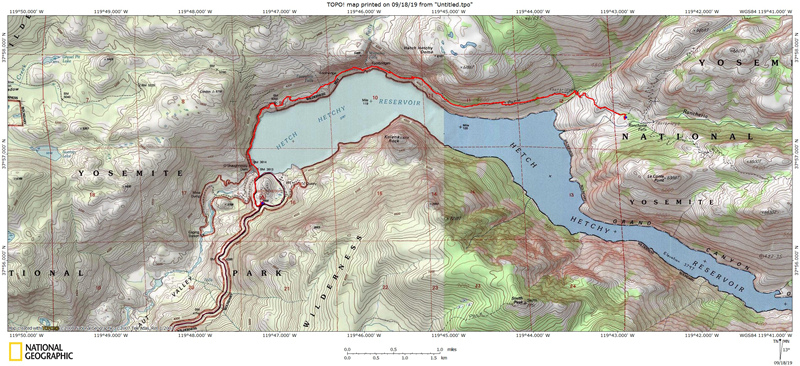
below.
The bright
red line shows Rancheria Falls Camp to the trailhead at Hetch
Hetchy Reservoir (overnight lot at the overnight camping area). Well
technically, it shows the path we took both ways on this out and back
trip.
Click on map or profile to be taken to the larger
version.
(Back
to top)
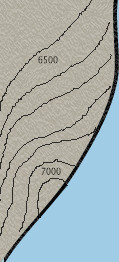
Here
is the profile from Rancheria Falls Camp to the trailhead at Hetch Hetchy
Reservoir (overnight lot at the overnight camping area).

(Back
to top)